There are a few mechanics in Eve that are kinda complicated and often get only partially understood, overheating being one of them. My approach to deal with this is usually to make a spreadsheet. This isn’t “Larynx is more into spreadsheets than Eve” as someone pointed out recently, but I just don’t want to lose 5 ships due to burnt modules before I get it.
Mechanics
Rack Heat
To start things off we have to talk about the 3 little bars in the capacitor. These represent your rack heat, and this is separate for each rack your ship has, so the low, mid, and high slots. Every module on your ship generates rack heat while being overloaded. This varies between 1% and 4% per second, depending on the module.
| Afterburner, Microwarpdrive | 4 % |
| Most T2 modules | 2 % |
| All other non-T2 Modules | 1 % |
Depending on your ship’s size there is now also a multiplier, generally decreasing with ship size.
| Frigate, Interdictor, Command Destroyer | 1 |
| Destroyer, Tactical Destroyer | 0,85 |
| Cruiser, Industrial, Mining Barge | 0,75 |
| Battlecruiser | 0,65 |
| Battleship | 0,5 |
| Carrier, Force Auxiliary | 0,4 |
| Dreadnought, Supercarrier, Orca, Rorqual | 0,35 |
| Titan | 0,25 |
Finally rack heat is being dissipated constantly, at a rate of exactly 1/100th of your current rack heat. So if you have 40% rack heat, then after a second you will lose .4% and have 39.6% rack heat left, provided there was no new heat generated of course.
Damaging Modules
Local Damage
Now at the end of every cycle, your modules can get damaged. The possibility of this happening is proportional to the rack heat, the number of high + mid + low slots that are online vs the total number of high + mid + low + rig slots. The amount of damage a module takes is depending on the module itself, and the thermodynamics skill and T3C/T3D overheating bonuses.
Spreading Damage
Whenever a module might take damage, then the modules next to it might also take damage, the amount of damage is exactly the same as the first module, but the occurrence is independent (in a statistical sense, meaning one takes damage without any correlation to the other taking damage) the possibility is the one of the original module multiplied by a factor for each slot in between. The factor between slots generally follows this table and is only dependant on the number of slots in the specific rack (there are exceptions like T3Cs, so please double-check via everef.net or pyfa. The attributes are called Heat Attenuation for high slots, heatAttenuationMed for mid slots, heatAttenuationLow for low slots)
| Slots | Heat Attenuation |
| 8 | 0.82 |
| 7 | 0.79 |
| 6 | 0.76 |
| 5 | 0.71 |
| 4 | 0.63 |
| 3 | 0.50 |
| 2 | 0.25 |
The chance continues to decrease with the same factor until the end of the rack is reached. Crucially the chance does not wrap around. This means that modules that are towards the edge of your rack will have a lower chance of damaging the other modules, than modules that sit in the middle. Here is a simple example graphing the damage chance multiplier over a typical 8 slot rack.
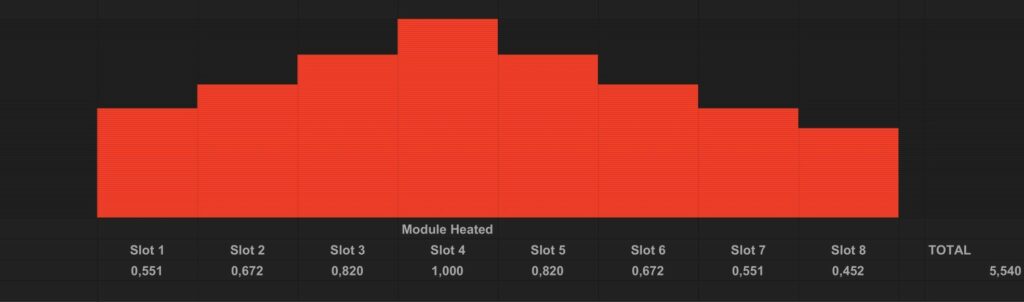
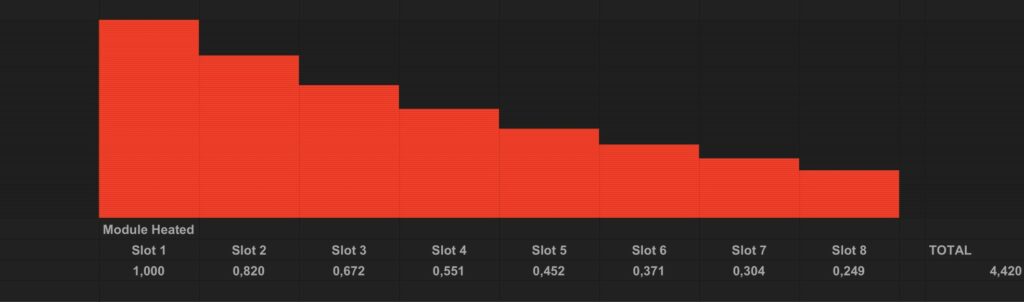
An interesting thing to note here is that this is all multiplicative. As such, each derived chance also depends linearly on your rack heat. This means that your ship size or special bonuses will never make another module layout better, you will only be able to heat every module longer on average.
Optimization
Goals
As now not every slot is not exactly the same there is an interesting optimization problem going on to find out where to put your modules. There is a lot of possibilities here. But the things that you want to achieve might be a lot different depending on preference or playstyle:
- Minimize the Damage on all slots in the rack
- Minimize the Damage on the heated slots in the rack
- Have your getaway module last the longest on average
- Minimize the standard deviation in between modules of the same group
Then you also have to consider some other factors depending on the way you use your ship:
- How long do you heat each module?
- What will the rack heat be at when you heat it?
All this combined can generate an optimal module layout. Defining what you are going to heat when is already pretty complicated. Personally, I always think about where in a fight I will start a module and then set the starting rack heat there and assume I only heat it once. If it is at the start of the fight, rack heat will be nearly 0 %, while when at the end you are looking at 100% most of the time, that way it is somewhat manageable.
Complicated Method
Based on this I made a Simulating Spreadsheet this essentially just calculates the rack heat for up to 30 cycles and then spits out the summed up value of all their chances so that you can see if the modules are going to be crisp at that point, and mess around with their sequence.
The Spreadsheet consists of different Scenarios that all represent one ship with a certain set of heat that has occurred to it. Each Scenario is independent and you can duplicate the empty one to create new ones when you need them. In each sheet, there is a Static Data row all the way to the left which you should adapt to the ship that you want to use this for.
Then there is the actual Simulation in the middle, which can represent a 1-8 slot rack. Here each module is represented by the cells with a grey box around them, and underneath the actual calculations take place. You can move these modules using Ctrl + C and Ctrl + V, but Ctrl + X doesn’t work (as it messes up the links). This is where you can change how long and when you want to heat each module. The very first line is just there for you to put your notes in.
Lastly all the way on the right you can see Statistics. These are created in total and per Group. A Group is just a way of telling the spreadsheet that a certain set of modules should be heated at the same time. This makes it so that the rack heat increases just how it should if you were to heat on a “real” internet spaceship.
Simple Method
For the spreadsheet wary, remember that the damage chance is linearly dependent on the rack heat? Assuming you only have one group of modules you heat, and you always heat them together (think weapons for example) it is actually possible to make some general arguments on where your modules should be and using the normal heat attenuation values for each amount of slots you will always end up with the same setup. Here is a quick overview of how your modules should be optimally placed. It shows you data for two things that you could optimize:
| Slots | 8 Filled | 7 Filled | 6 Filled | 5 Filled | 4 Filled | 3 Filled | 2 Filled | 1 Filled |
| 8 | x x x x x x x x | x x x x – x x x | xxx – – xxx | x x – x – – x x | x x – – – – x x | x – – x – – – x | x – – – – – – x | x – – – – – – – |
| 7 | x x x x x x x | x x x – x x x | x x – x – x x | x x – – – x x | x – – x – – x | x – – – – – x | x – – – – – – | |
| 6 | x x x x x x | x x x – x x | x x – – x x | x – x – – x | x – – – – x | x – – – – – | ||
| 5 | x x x x x | x x – x x | x – x – x | x – – – x | x – – – – | |||
| 4 | x x x x | x x – x | x – – x | x – – – | ||||
| 3 | x x x | x – x | x – – | |||||
| 2 | xx | x – | ||||||
| 1 | x |
Summary
So I hoped you learned something about heating as well along the way, if you really don’t want to spreadsheet yourself and need your exact setup optimized then you might try on this hastily created discord because maybe I will have time to help out. Otherwise, if you think this whole thing is way overkill, then here is a few key points that I learned along the way:
- Empty/offline slots are good for heating, a single one gives you between 4% and 9% of extra time you can heat
- Modules that generate a lot of heat damage should be at the edges of your racks
- For high slots you should put your guns all the way left and right, and if you have an odd number you might put a single module in the middle
- Prop Mods generate a lot of rack heat, meaning every mid slot will burn down fast after you heated them.
- Ancillary Shield Boosters generate very little heat, they should almost never run cold
2 Comments
Thanks for the good writeup! I remember reading a post that was years old on the eve forums that went pretty in depth so it’s nice to see it all written up in a more modern format.
By the way your discord link seems to have expired.
Thanks as well! There is still a lot of misconceptions about heat and I had already spent the time figuring out a simulation spreadsheet, so I figured might as well write something about it.
The Discord link should be fixed now as well. No wonder nobody ever used it xD.