Update for the rolling changes coming MAR-023
With the incoming changes in maximum jump mass the rolling META has changed slightly:
- For 1m mass holes, you can now roll effectively with any battleship. This will make the Hyperion another strong Combat Roller, and Typhoons will be slightly faster than Tempests for Speed Rollers.
- For 2m mass holes, having a Battleship just over 100Gg mass will reduce the chance of needing a HIC from around 1% with the old setups to 0%. Thus using plates or heavier Battleships is now META. I suggest looking at Hyperions and Typhoons as well.
There is a theoretical setup to roll with 360Gg (hot) mass Battleships with 6 hot jumps which only needs 3 characters. This will close the Hole with a 96% chance. (4% chance you need a HIC), however you don’t have a safety margin, so any additional mass on the hole increases your chance to roll something out. This mass can be reached with Armageddons and a lot of T2 1600mm plates that have been abyssal rolled for max mass, as well as not training Armor Layering. Setups like this will be very slow when reapproaching the wormhole and are probably not worth it for most people. - For 3m mass holes, using heavier ships will start to build a chance you roll a Battleship out, so sub 100Gg mass Battleships are still preferred. I did not do the math on heavier ships, but it is certainly possible somehow.
- For 5m holes, you should already be better at calculating than then I am.
This is one of the most used ships in Wormhole space, and while the basics are always the same, there is a lot of different ways you can fly them and make them work. Everyone has an opinion on what the best possible Roller is, so I am not going to argue that. But I want to explain a few categories that allow for effective definitions of “best” and therefore for a clear solution.
Speed Rollers
These ones are quite simple, you just want the maximum possible speed for rolling. The meta here is generally well known, you either run a cheap Tempest or a more expensive Machariel. You don’t expect to live very long when engaged, and just want to maximize your utility to maybe still get out of a sticky situation. You want to fit
- Higgs Anchor
- MWD (To get back fast)
- AB (To do your duty when you are scrambled)
- MJD (To Escape)
- Cloak (To stay at holes/escape)
- Probe Launcher (Because nobody is perfect)
- Overdrives / Hyperspatials / Inertial Stabilizers (to be fast)
- Burst Jammer (to disable tackle)
- Neuts / Smartbombs (to disable tackle)
We will not consider any kind of tank modules in this first part, I will explain later why. This generally comes down to two questions. How do we split Overdrives / Hyperspatials / Inertial Stabilizers? And how do we split Neuts / Smartbombs?
Overdrives / Hyperspatials / Inertial Stabilizers
For the Rigs, a Hyperspatial Rig will always shave 4-5 seconds of your total warp time, while any kind of Astronautics Rig will change the reapproach time by less than that, so the Rigs should always be Hyperspatials.
The Lowslots are a little bit more nuanced. Just straight up going for reapproach speed a 3 / 3 split of Overdrives / Inertials gives the highest base speed (I considered Nanofibers but they are worse because of stacking penalties). Each Hyperspatial will generally save you about 1.5 seconds in warp time, while the last Overdrive will give you about 1.5 seconds as well if you spawn at 15km, gradually decreasing. If you assume that the mean spawn distance is 10km and the standard deviation is 2.5km (My assumption, I would love to see actual data on that) then this will result in about 0.7 seconds on average – so Hyperspatial or Overdrive don’t make much of a difference in the total time from undock to jumping back. I went with the Overdrive because I think reapproaching might be a little bit more important.
Neuts / Smartbombs
Warp Disruption Probes have 1000 HP and a Smartbomb does 300 damage – this means that you would need to have 4 Smartbombs to reliably clear a Bubble in 1 cycle or 2 for 2 cycles. T2 Smartbombs are not that good since they have a “Dead Zone” between 5 and 6km of the wormhole where you can’t jump, nor Smartbomb and warp away, and as T1s do less damage you should always use meta Smartbombs. It is hard to find out, if giving up 2 or 4 slots on a Roller to maybe Smartbomb a Bubble is worth it, as it relies a lot on where the Bubble is.
I would argue that typically a Sabre warps to the hole at 0 (2.5km deviation up to either side, assumed equal possibility) and drops a Bubble, while you are approaching. You will be at least 6km away (otherwise you will have enough momentum to jump with the AB). Doing some quick maths, this means that in the best case your Smartbomb radius will cover about 21.3% of all locations where the Bubbly might be – so the chance you successfully smartbomb it is about 1/5, going up with the number of rollers you have. This is not enough for me, so I go full Neuts. Initially, I had all heavy Neuts, Roxane Barviainen pointed out to me that having some Medium Neuts as well might be more useful than just all heavys. And after Roxane escaped a gank attempt from my corp with every single ship, I sat down and put some more time into it. At the moment I am in favor of a 4/2 split, as you can neut every third tick (And only with 6 Mediums you can Neut every 2nd, otherwise you get something in between). You would want to activate them in the order HHMMHH in order to get the best spread.
Additional Modules
This is it pretty much, I added a Cap Booster each to keep the Neuts running and the Machariel has 1 more midslot, you can put pretty much whatever you want in there, it doesn’t change performance.
I put a Target Spectrum Breaker just because that module is cool. You might also want to tackle something while you die or do something else.
I did some basic heat optimization as well, nothing fancy, just maximizing the time you can heat the Neuts and Prop Mods, and putting modules that shouldn’t burn up further away.
Fast Rolling Tempest
[Tempest, Meta Fast Roller]

Overdrive Injector System II
Overdrive Injector System II
Overdrive Injector System II
Inertial Stabilizers II
Inertial Stabilizers II
Inertial Stabilizers II

500MN Quad LiF Restrained Microwarpdrive
Heavy F-RX Compact Capacitor Booster, Cap Booster 3200
Large Micro Jump Drive
Burst Jammer II
100MN Afterburner II

Heavy Energy Neutralizer II
Heavy Energy Neutralizer II
Core Probe Launcher I
Medium Energy Neutralizer II
Medium Energy Neutralizer II
Improved Cloaking Device II
Heavy Energy Neutralizer II
Heavy Energy Neutralizer II

Large Higgs Anchor I
Large Hyperspatial Velocity Optimizer I
Large Hyperspatial Velocity Optimizer I


Hornet EC-300 x5
Vespa EC-600 x5


Cap Booster 3200 x3
Core Scanner Probe I x16
Border-5 'Pochven' Filament x1
Proximity-5 'Extraction' Filament x1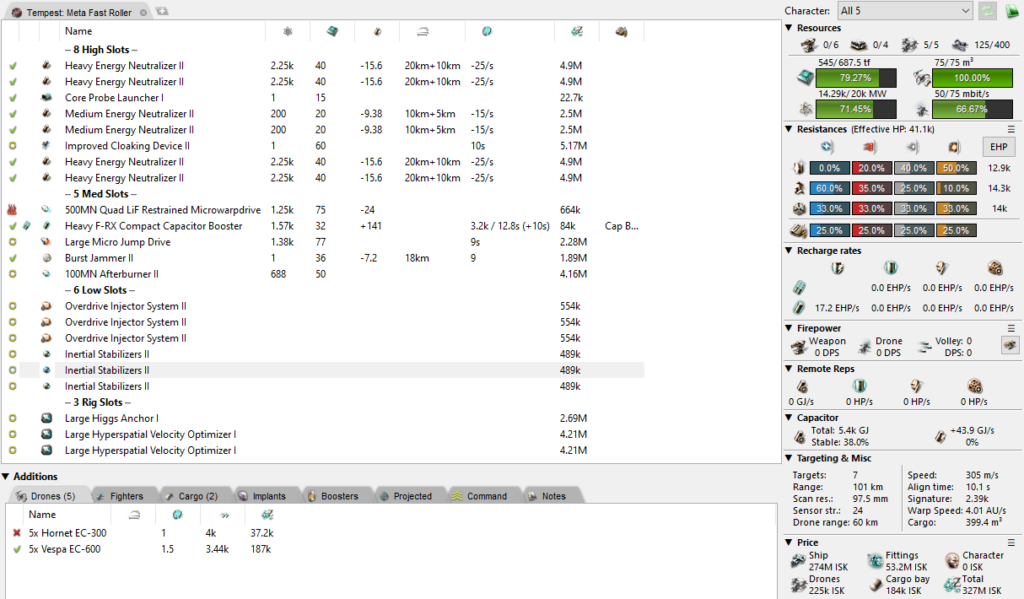
If you want a Heavy Roller than pretty much the exact same fit can be used on a Typhoon, due to stacking penalties the 7th lowslot is used for a DCU here, the speed increase would be marginal.
Fast Rolling Tempest
[Typhoon, Meta Fast Roller]

Damage Control II
Overdrive Injector System II
Overdrive Injector System II
Overdrive Injector System II
Inertial Stabilizers II
Inertial Stabilizers II
Inertial Stabilizers II

500MN Quad LiF Restrained Microwarpdrive
Burst Jammer II
Large Micro Jump Drive
Heavy F-RX Compact Capacitor Booster, Navy Cap Booster 3200
100MN Afterburner II

Heavy Energy Neutralizer II
Heavy Energy Neutralizer II
Medium Energy Neutralizer II
Improved Cloaking Device II
Medium Energy Neutralizer II
Heavy Energy Neutralizer II
Heavy Energy Neutralizer II

Large Hyperspatial Velocity Optimizer I
Large Hyperspatial Velocity Optimizer I
Large Higgs Anchor I


Hornet EC-300 x5
Wasp EC-900 x4


Navy Cap Booster 3200 x4
Core Scanner Probe I x16
Border-5 'Pochven' Filament x1
Proximity-5 'Extraction' Filament x1
Core Probe Launcher I x1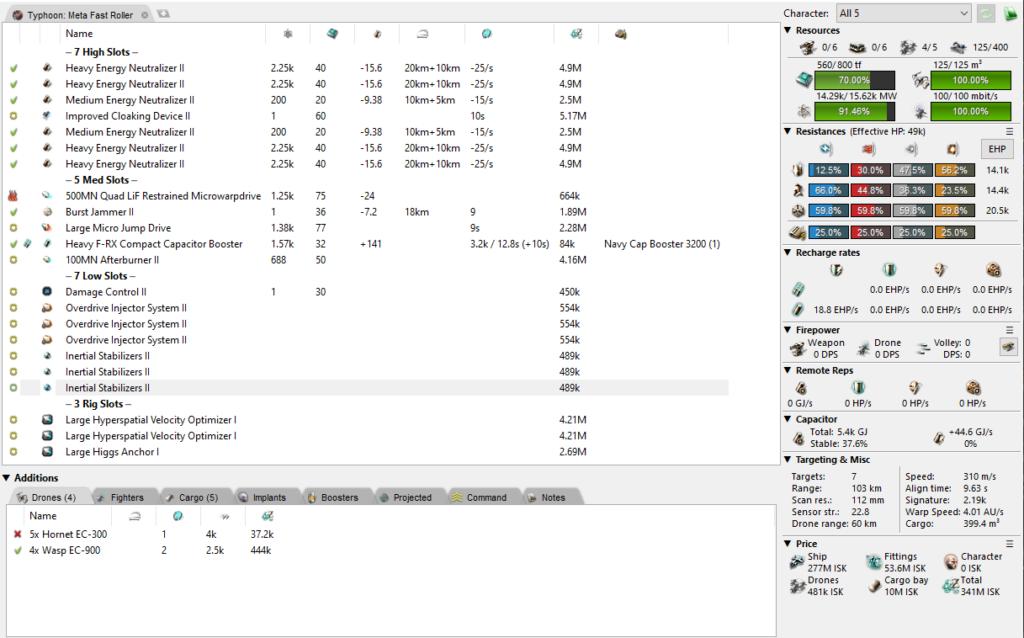
For the Machariel there is some more things to do. Roxane Barviainen (again) recently urged me to put a plate(s) on the Marchariel as the mass is too low to use it as a roller properly. Without any plates, the chance that you need a rolling HIC is over 20%! So I change the fit to include two plates, with this the chance you need a HIC goes down to 0.28%. For comparison: With the Tempests, the chance is 2%. As the addition of mass is what slows you down there is not really any way you can get a benefit from fitting a different set of plates.
One thing that you have to be cautious however is that if you don’t have Armor Layering V, then you will be over 300Gg. This can lead to chances of rollouts on 3000Gg Holes, as well as 1000Gg holes using the lazy 4 hot method! Use a 1600mm T2 and 800mm T2 plate instead.
The only thing that could also be interesting is a single max mass abyssal plate, giving you room for another Overdrive Injector System, while increasing the chance that you need a HIC to 6.7%, but saves you another 2 seconds on your average reapproach time. And finally if you want a heavy roller just put some T2 1600mm Plates and you are good.
Fast Rolling Machariel
[Machariel, Meta Fast Roller]

Overdrive Injector System II
Overdrive Injector System II
Inertial Stabilizers II
Inertial Stabilizers II
1600mm Rolled Tungsten Compact Plates
1600mm Rolled Tungsten Compact Plates

500MN Quad LiF Restrained Microwarpdrive
Signature Radius Suppressor I
Burst Jammer II
Large Micro Jump Drive
Heavy F-RX Compact Capacitor Booster, Navy Cap Booster 3200
100MN Afterburner II

Heavy Energy Neutralizer II
Heavy Energy Neutralizer II
Improved Cloaking Device II
Medium Energy Neutralizer II
Medium Energy Neutralizer II
Core Probe Launcher I
Heavy Energy Neutralizer II
Heavy Energy Neutralizer II

Large Higgs Anchor I
Large Hyperspatial Velocity Optimizer II
Large Hyperspatial Velocity Optimizer II


Hornet EC-300 x5
Vespa EC-600 x10


Navy Cap Booster 3200 x4
Sisters Core Scanner Probe x16
Border-5 'Pochven' Filament x1
Proximity-5 'Extraction' Filament x1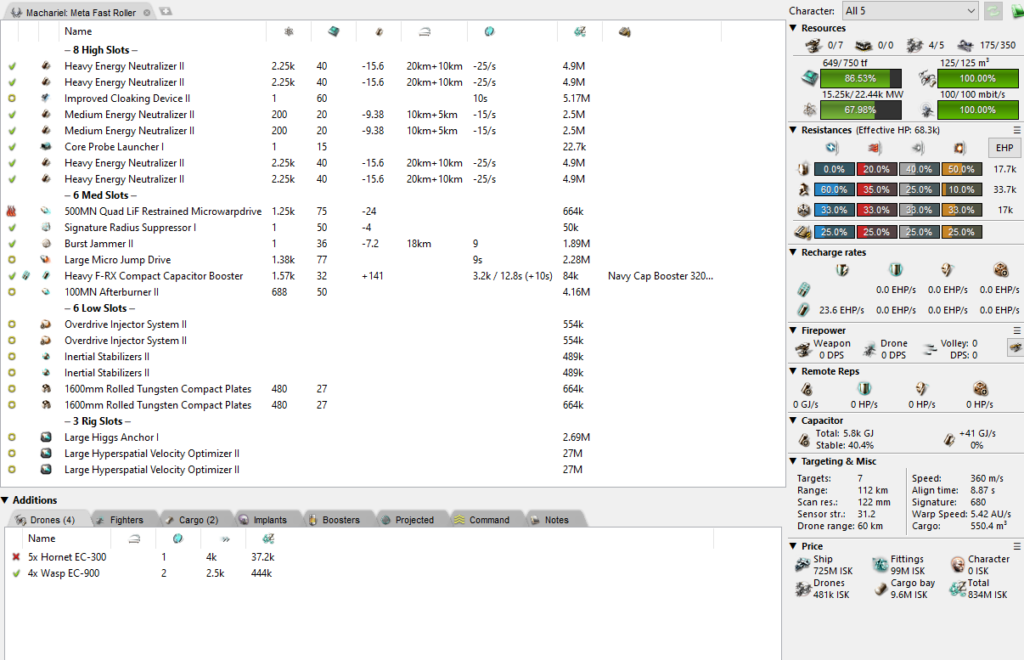
Combat Rollers
These ones are meant to shoot back while rolling. In the past I thought that just putting a higgs rig on a normal combat battleship, nowadays I think that notion is too unprecise. Usually, when you roll a hole then you should do it in a way where a potential enemy has only very short notice of your action. If you know if someone has eyes in your home and stick to this rule, then fast rollers will outperform combat rollers in most cases. It just takes a good combat scout a few seconds to locate your rollers, and then at least 20 more seconds for an enemy fleet to warp to your location. As fast rollers tend to be back at the hole after 40 seconds, this leaves only seconds for the enemy to either boosh your rollers of, or start bumping them. The reason you might want to use combat rollers anyway is if your enemy is expecting you to roll, after you have already done a pass. Even then it might be a better option just bring a single brick tanked bait roller, and then lighter cruisers as combat support. That way you don’t have issues of getting closed out, and you can bring more stuff if the enemy escalates more. You also have less problems with booshes as your ships burn and lock faster (except the bait of course).
If you want to go with combat rollers anyway, then there is one thing that I highly recommend to you that is often overlooked. No matter how combat-capable your battleship is, you always run into the problem the enemy can boosh you off, and then just keep out of range of your close-range weaponry, while slowly whittling you away. Most people don’t try to 1v1 your roller, so they will just bounce if they ever get low. Something like an LML MSB Hawk or LML MSB Bifrost can hold you indefinitely.
There is two ways to deal with this scenario.
- To have an MJD and jump back to the hole if you get Booshed off
- To Scram the Boosher before it booshes you
Both of these again aren’t quite trivial. For the first one you have to find out exactly when to use your MJD, and Mordus Legion ships might still deny that from outside of your range, or a HIC Point with Warp Disruption Script (40km Range) will also still stop it. For the second one you need to be able to lock a ship with sig of 149 in less than 5 seconds. As both of these aren’t trivial having both options would be ideal.
I am currently working on fits that meet these requirements and still have significant DPS and tank. Until then I will leave up the old fits that don’t meet these criteria below.
Cheap Combat Roller
The ship that suits this best is the Megathron. The High-, Lowslots and Rigs are pretty self-explanatory. The only interesting thing are the Midslots. Because there are only 4 one has to make a sacrifice. If your goal is to shoot tackle you need at least a Scram + Grapple to apply, you need an MWD for certain, and the last slot can be either an AB (making you susceptible to Neuts) or a Cap Booster (making you unable to close a Hole when scrammed). There isn’t really a good solution here. I went out for a walk on this problem, and when coming back realized that the Cap Booster is probably better: You have a way to deal with Scrams – shoot the one scramming you, but you don’t have a way to deal with Neuts. I rounded the fit off with the always useful EC-300s and a hard-to-kill CN Vespas.
Buffer Rolling Megathron
[Megathron, Combat Roller]

Damage Control II
Magnetic Field Stabilizer II
Magnetic Field Stabilizer II
Reinforced Bulkheads II
Reinforced Bulkheads II
Reinforced Bulkheads II
Reinforced Bulkheads II
Reinforced Bulkheads II

500MN Y-T8 Compact Microwarpdrive
Heavy F-RX Compact Capacitor Booster, Navy Cap Booster 800
Warp Scrambler II
Heavy Gunnar Compact Stasis Grappler

Neutron Blaster Cannon II
Neutron Blaster Cannon II
Neutron Blaster Cannon II
Neutron Blaster Cannon II
Neutron Blaster Cannon II
Neutron Blaster Cannon II
Neutron Blaster Cannon II

Large Higgs Anchor I
Large Transverse Bulkhead I
Large Transverse Bulkhead I


Caldari Navy Vespa x5
Hornet EC-300 x5


Null L x2000
Void L x2000
Navy Cap Booster 800 x10
Caldari Navy Antimatter Charge L x1000
Core Scanner Probe I x16
Mobile Depot x1
Agency 'Pyrolancea' DB5 Dose II x1
Standard Drop Booster x1
Core Probe Launcher I x1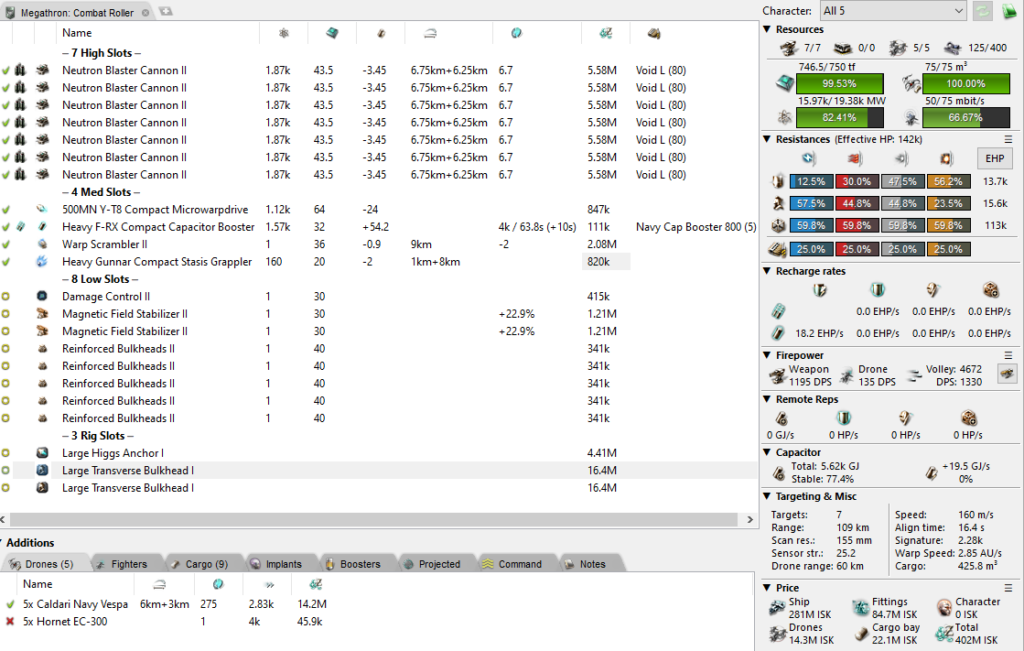
Maximum Capability Combat Roller
If you don’t like the tradeoff that must be made with the Midslots of the Megathron and want to catch people by surprise, then you might want to look at the Dominix Navy. Not a lot of people know that this ship is actually a Roller, but it actually is! For about 300m more than the Megathron you can get an absolutely silly roller, which gets about the same DPS, but 2 more Midslots (making it possible to circumvent the tradeoffs) and twice as much EHP.
Combat Rolling Dominix Navy Issue
[Dominix Navy Issue, Combat Roller]

Reinforced Bulkheads II
Reinforced Bulkheads II
Reinforced Bulkheads II
Reinforced Bulkheads II
Reinforced Bulkheads II
Reinforced Bulkheads II
Damage Control II

500MN Quad LiF Restrained Microwarpdrive
100MN Afterburner II
Warp Scrambler II
Stasis Webifier II
Heavy Stasis Grappler II
Medium Capacitor Booster II, Navy Cap Booster 800

Neutron Blaster Cannon II
Neutron Blaster Cannon II
Neutron Blaster Cannon II
Neutron Blaster Cannon II
Neutron Blaster Cannon II
Neutron Blaster Cannon II

Large Transverse Bulkhead II
Large Transverse Bulkhead II
Large Higgs Anchor I


Acolyte II x5
Caldari Navy Wasp x5
Hammerhead II x5
Ogre II x5
Vespa EC-600 x5
Warrior II x5


Null L x2000
Void L x2000
Navy Cap Booster 800 x8
Caldari Navy Antimatter Charge L x1000
Sisters Core Scanner Probe x16
Mobile Depot x1
Agency 'Pyrolancea' DB5 Dose II x1
Standard Drop Booster x1
Core Probe Launcher I x1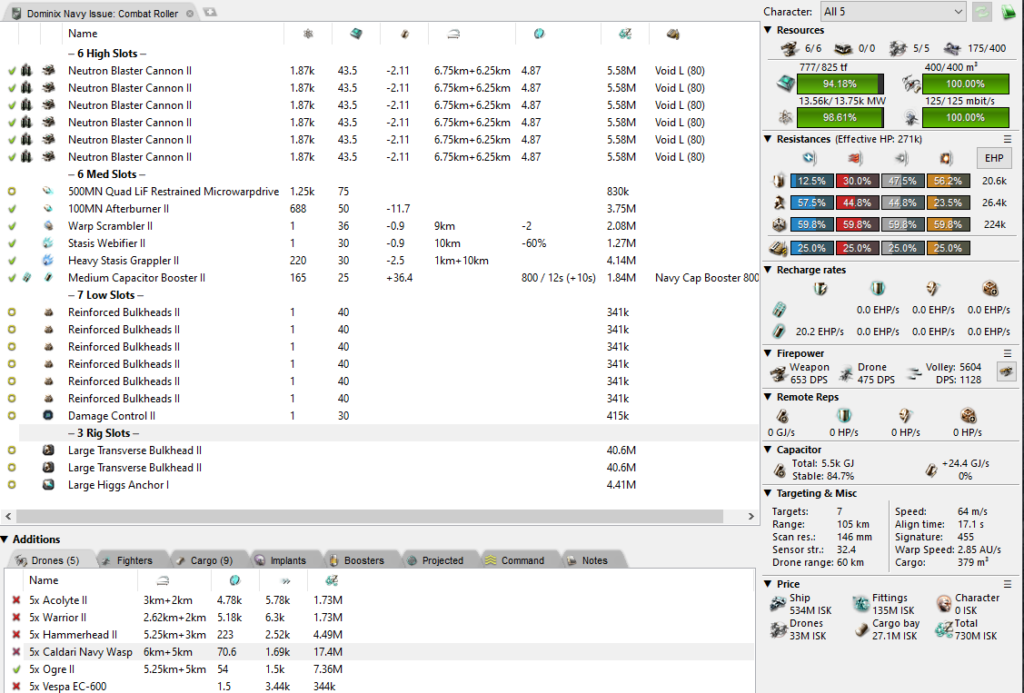
Coasting Rollers
The idea seems to be common that you put some kind of combination of tank and speed modules on your Roller, making them be able to “coast” to the wormhole while tanking the incoming DPS. There seem to be a lot of different ways that people do this. Some people tank their Tempests / Machariels and give up some speed, while other people fit speed mods on their slow Megathrons. This strategy absolutely falls appart when the enemy starts bumping (fairly common) or booshing (not that common). Personally I would never run a ship with this requirement set, but if you really think it is a good idea, then here is the meta way to do it.
I thought the only real way to evaluate ships is to look at different Scram + Webs scenarios and calculate the time that it takes to get to the wormhole so that we can calculate the maximum DPS that can come in. I decided to make a spreadsheet (you can find all the fits above in there). Since distance dependent on time has an exponential and a proportional factor (formula from an archived Eve Wiki page, integrate with respect to t from 0 to t to get the distance) and I didn’t want to deal with Riemann-Zeta functions for this, I decided to do an approximate VLOOKUP() in the spreadsheet, I then use the same mean and standard deviation in jump ranges that I used earlier to determine a weighted average.
While trying a few fits I realized that the (so far) best one is a max tanked Megathron, fitting one Speed Mod already reduces the average DPS you can tank in almost all scenarios. This optimal coaster fit will take a long time to get back to the hole, so maybe this isn’t too realistic if you consider bumping.
Nonetheless, I decided to stick with it and go all-in on stuff that can reduce your time to get back to the hole, namely a Burst Jammer, Neuts, and Noses so that you can keep your AB going no matter what and try to shed Webs / Scrams. There is probably a better active tanked fit for when you are under 2+ Webs as this one only tanks 650 DPS in that Scenario, but for the other 4 Scenarios, it is pretty good (the Combat Dominix Navy fit also gets good performance in this scenario). Again this whole thing falls apart anyway when you get bumped or booshed away from your hole and as such, I don’t recommend this kind of fit.
| Average Return Time (s) | Average DPS Tank | |
| MWD | 38 | 5125 |
| MWD + 1 Web | 88 | 2572 |
| MWD + 2 Web | 155 | 1400 |
| AB (Scrammed) | 76 | 2701 |
| AB + 1 Web | 175 | 1254 |
| AB + 2 Web | 350 | 649 |
Cheap Coaster Megathron
[Megathron, Cheap Coaster]

Damage Control II
Reinforced Bulkheads II
Reinforced Bulkheads II
Reinforced Bulkheads II
Reinforced Bulkheads II
Reinforced Bulkheads II
Reinforced Bulkheads II
Reinforced Bulkheads II

500MN Y-T8 Compact Microwarpdrive
Burst Jammer II
Large Micro Jump Drive
100MN Afterburner II

Heavy Ghoul Compact Energy Nosferatu
Core Probe Launcher I /OFFLINE
Heavy Gremlin Compact Energy Neutralizer
Heavy Gremlin Compact Energy Neutralizer
Heavy Gremlin Compact Energy Neutralizer
Prototype Cloaking Device I
Heavy Ghoul Compact Energy Nosferatu

Large Higgs Anchor I
Large Transverse Bulkhead I
Large Transverse Bulkhead I


Hornet EC-300 x5
Vespa EC-600 x5


Core Scanner Probe I x16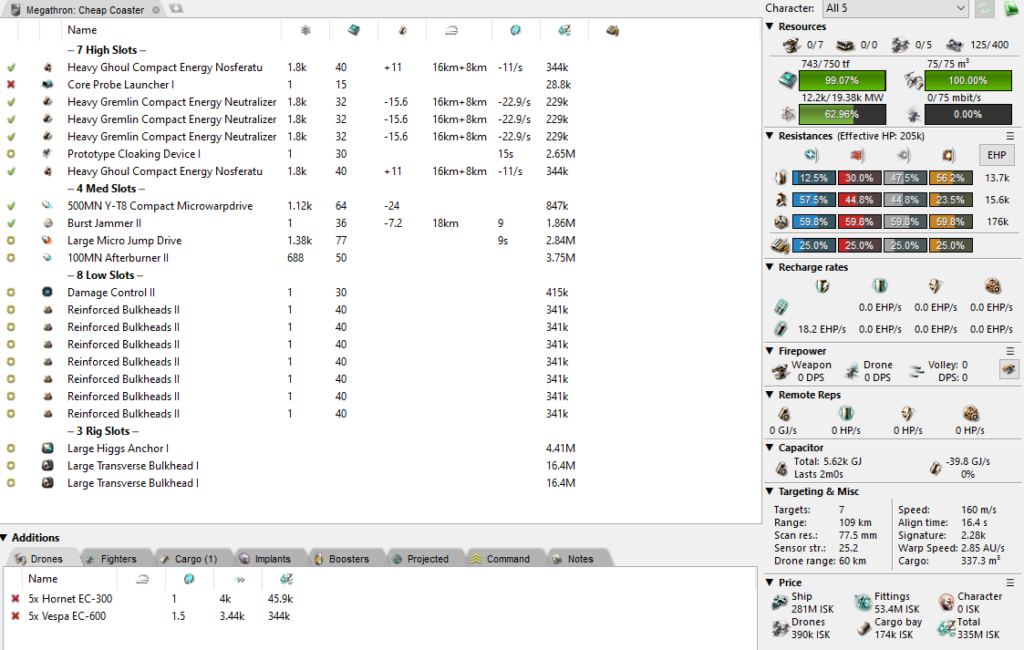
Conclusion
So we have seen that there are a few ways you can run your rolling ships, each having its own advantages and disadvantages. I am pretty happy with the Fast and Combat Rollers, but I don’t quite like the coaster fit – there just has to be some better active tanked solution for that exact problem.
I personally run the fast Tempest, just because we have 2m Mass holes, and every Corp member has 3+ Accounts. This makes us able to roll rather quickly, for example, yesterday we had a ~10 man Drekavac fleet in our Static, a Sabre on our hole, and a Scout in our hole. Nonetheless, we were able to crit the hole with 3 Tempests, though admittedly one died – we tried to warp it instead of MJDing out.